When people order custom lab coats, the conversation is usually about color, embroidery, and fit. Those matter, but they sit on top of a decision that matters more: whether the coat is actually rated for the hazard it will meet. A branded coat for a front-desk pharmacist and a coat for a nurse handling blood draws and a coat for a chemistry student working over an open flame are three different garments, even if they look the same in a catalog photo. Two families of standards separate them — liquid-barrier ratings for healthcare and flammability behavior for labs with heat or reactive chemicals — and a buyer who understands both can specify the right coat instead of hoping the default works.
Two risks, two standards
Fluid exposure and fire are governed by completely different systems, and a coat can be strong on one and useless on the other. In healthcare settings, liquid protection is classified under ANSI/AAMI PB70, which sorts protective apparel into four barrier levels based on standardized lab tests. In labs where flammable solvents, pyrophorics, or open flames are present, the relevant question is not a barrier level at all but what the fabric does when it meets heat — whether it resists ignition, and whether it melts. A typical branded, embroidered lab coat is a 65/35 poly-cotton in the medium weight range, which is comfortable and durable but carries no meaningful barrier rating and behaves poorly near flame. That is fine for a clinic hallway and genuinely dangerous over a Bunsen burner, so the first job is to name the real hazard before choosing a fabric.
What the AAMI PB70 levels actually mean
PB70 defines four levels, and each is tied to a specific test rather than a marketing adjective. Level 1 is minimal protection, evaluated with the AATCC 42 water-impact test, where a passing fabric shows only a small blotter weight gain; it suits incidental splash or spray. Level 2 adds the AATCC 127 hydrostatic-pressure test and requires the fabric to hold a water column of at least 20 cm, covering low-risk fluid contact under light pressure. Level 3 uses the same two tests but raises the hydrostatic bar to a minimum of 50 cm, for sustained liquid exposure. Level 4 is a different animal entirely: it is verified with ASTM F1671, which challenges the fabric with a bacteriophage suspension to check for viral penetration, or ASTM F1670 using synthetic blood, with no penetration permitted at 2 psi. Level 4 is the domain of surgical and isolation gowns, not everyday coats.
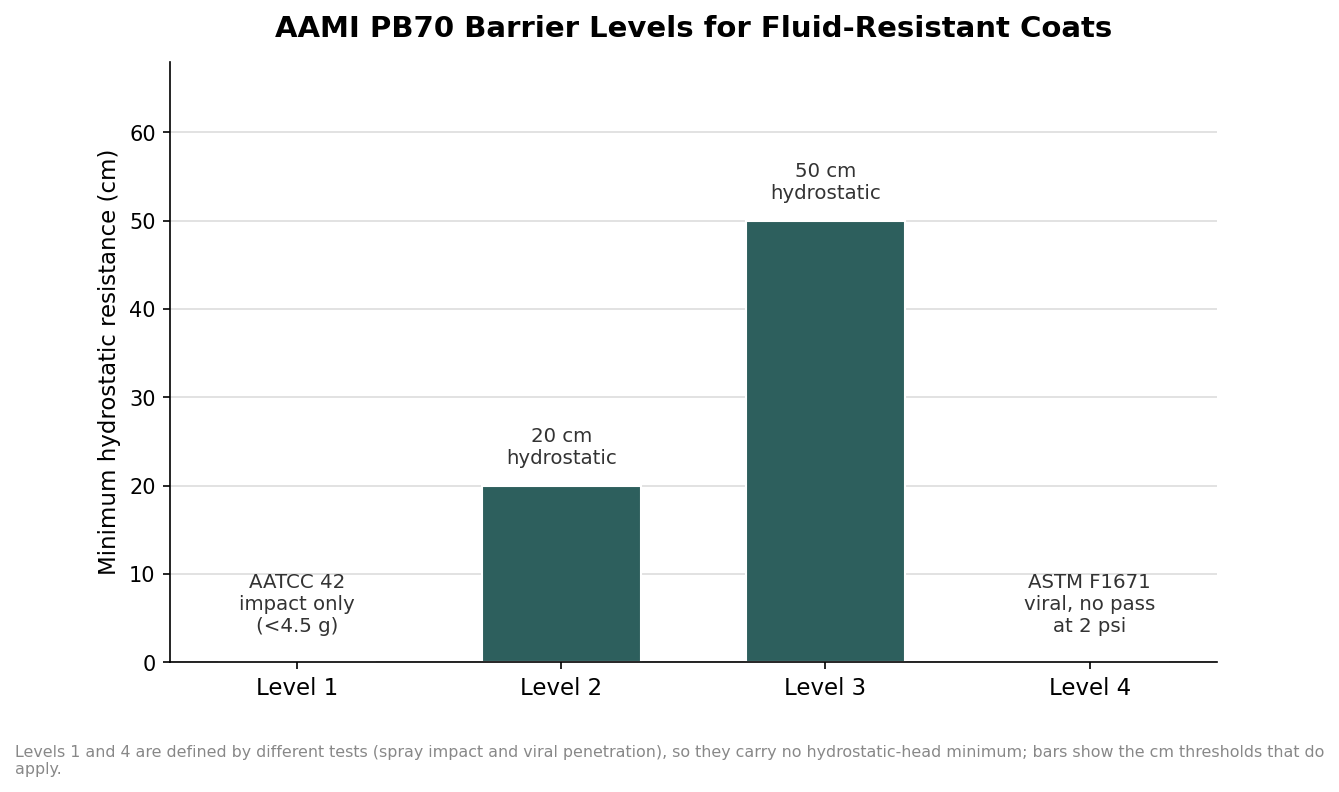
The practical takeaway is that the levels are not a simple 1-to-10 scale you can eyeball. Level 2 and Level 3 differ only in how much pressure the barrier withstands, while Level 1 and Level 4 are defined by entirely separate tests. If a supplier tells you a coat is “fluid resistant,” the useful follow-up is which PB70 level and which test method, because “resists a coffee spill” and “blocks viral penetration at 2 psi” are both technically fluid resistance and are worlds apart in protection.
Matching a barrier level to the room
Choosing a level is really about matching the test scenario to the daily task. Reception, teaching, and light clinical duties rarely need more than Level 1, and often the barrier question is moot because the coat is chosen for appearance and identity rather than protection. Routine patient care with occasional fluid contact — blood draws, minor procedures, dentistry — points toward Level 2 or Level 3, where the hydrostatic threshold means a splash under some pressure will not soak through to scrubs or skin. Surgery and isolation require Level 4 garments verified against viral or blood penetration, and those are generally single-use or specially laundered rather than branded reusables. For most custom-coat programs aimed at clinics, pharmacies, and schools, the honest answer is Level 1 to Level 2, with the important caveat that a fluid-resistant finish adds cost and can wash out over time, so the coat should be re-evaluated across its laundering life rather than assumed to hold its rating forever.
Flammability: where a poly-cotton coat becomes a liability
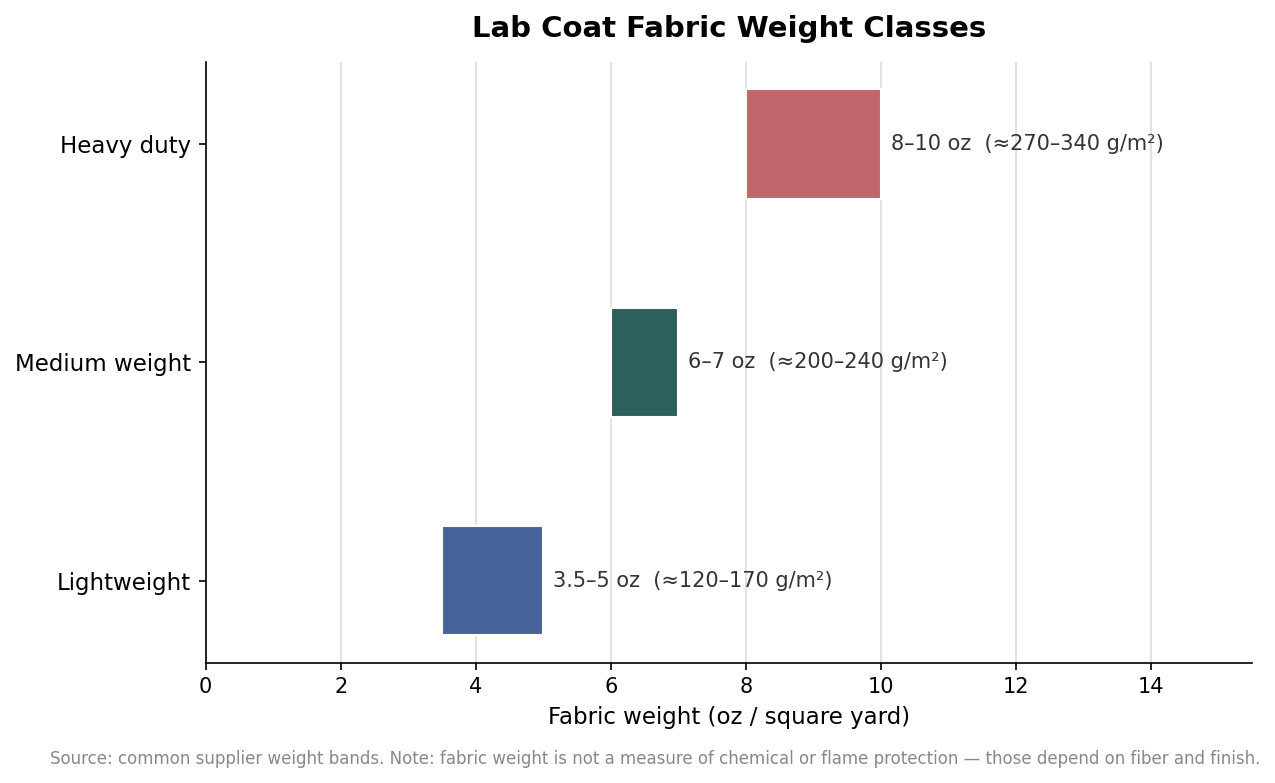
Fabric weight tells you about durability and drape, not fire safety — a heavier coat is not a safer one near flame. What matters is fiber. Polyester melts and can fuse to skin, which is why 65/35 and 80/20 poly-cotton blends are prohibited in many academic chemistry labs with open flames, and why a 40/60 blend is only appropriate in flame-free environments. Where there are Bunsen burners, hot plates, pyrophoric compounds, or flammable solvents, the baseline is 100% cotton, which burns more slowly and does not melt. For higher exposure, flame-resistant materials step in: FR-treated cotton carries a chemical finish that resists ignition but can degrade under bleach or high-temperature laundering, while inherently flame-resistant fibers like Nomex build the protection into the fiber itself, do not wash out, and cost accordingly — commonly north of $120 per coat, with the most protective Nomex blends (roughly 93% Nomex, 5% Kevlar, 2% antistatic fiber) running over $200. One tradeoff worth naming: fire resistance and chemical resistance often pull against each other, so a fabric optimized for flame may be less ideal for certain solvent splashes, which is exactly why the hazard assessment has to come first.
Specifying a custom coat without losing the protection
Once the fabric is right, customization should be designed around it rather than against it. Embroidery is generally the safe branding method on protective coats because it does not add a meltable film the way some heat-applied vinyls can, but placement still matters: logos belong on the chest and, if requested, the sleeve, away from areas where a molten transfer near a flame would be a hazard. For fluid-rated coats, remember that seams and closures are potential weak points, and that the rating applies to the fabric as tested, not automatically to a heavily modified garment. For FR coats, tell your team not to bleach them and to follow the manufacturer’s laundering guidance, because improper washing is the most common way a flame-resistant coat quietly stops being flame resistant. And because a medium-weight 6-to-7-ounce poly-cotton is the default that shows up when no one specifies otherwise, the single most valuable line in a custom order is the one that states the hazard and the required rating — Level 1 versus Level 3, standard versus 100% cotton versus inherently FR — so the coat that arrives is built for the room it will actually be worn in.
Leave a Reply